
Deploy ASP.NET Core App on Azure
- Niotechone Marketing Team
Table of Contents
- Introduction
- Why Deploy ASP.NET Core Apps on Azure?
- Requirements For Deploy
- How to Deploy an ASP.NET Core Application on Azure
- Step 1: Create an ASP.NET Core Application
- Step 2: Publish Application from Visual Studio
- Step 3: Create Azure App Service
- Step 4: Configure Build and Deployment Settings
- Step 5: Deploy ASP.NET Core Application
- Step 6: Verify Deployment
- Step 7: Configure CI/CD Pipeline (Optional but Recommended)
- Step 8: Monitoring and Performance Optimization
- Step 9: Scaling Your ASP.NET Core App
- Best Practices for Azure Deployment
- Common Deployment Issues & Fixes
- Real-World Use Cases
- Why Businesses Prefer .NET + Azure Stack
- Conclusion
Introduction
ASP.NET Core is a Microsoft framework that developers use to build web apps, APIs, and enterprise systems. It’s fast and open-source, and when you use it with Azure, it becomes pretty easy to deploy and scale applications.
Many companies choose an ASP.NET development company when they want help with deployment or proper management. In this blog, we’ll see how to deploy an ASP.NET Core app on Azure step by step.
Why Deploy ASP.NET Core Apps on Azure?
Before deployment steps, it’s good to know why Azure is used for ASP.NET Core apps.
Azure is popular because it scales easily, has CI/CD, security is strong, and it works with Visual Studio. Also runs in many regions, so performance is better.
That’s why companies go with an ASP.NET Core development company or cloud application services provider for this work.
Requirements For Deploy
- Visual Studio 2022 or later: use it for build + publish ASP.NET Core app
- .NET SDK installed: needed so .NET apps can run on your system
- Azure account (free or paid): for hosting the app on Azure
- Active ASP.NET Core project: means your app is already ready to deploy
- Basic understanding of Azure App Services: just to know how hosting works in Azure
How to Deploy an ASP.NET Core Application on Azure
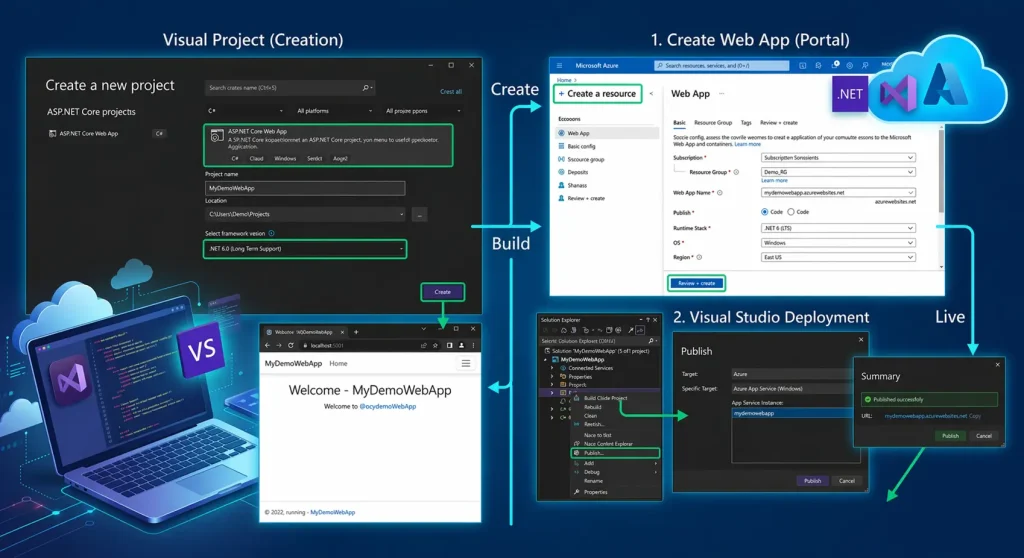
Step 1: Create an ASP.NET Core Application
- I didn’t have any project, so I created one in Visual Studio using “Create New Project.”
- Selected “ASP.NET Core Web App,” entered project name and location, and chose .NET 6
- Clicked Create, waited a few seconds, and ran the project to check everything was working
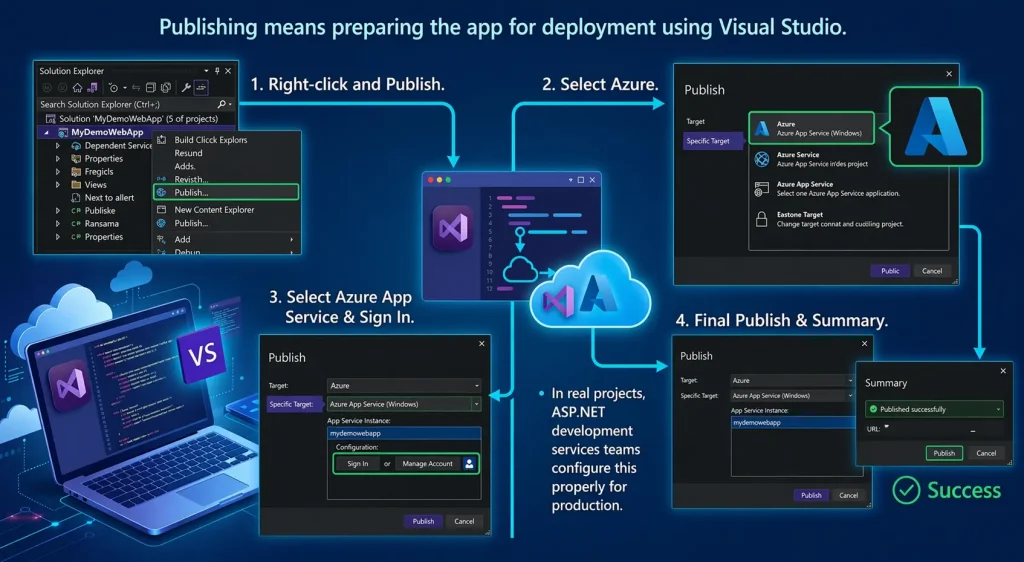
Step 2: Publish Application from Visual Studio
- Publishing means preparing the app for deployment using Visual Studio
- Right-clicked the project, clicked Publish, selected Azure and Azure App Service, then signed in
- In real projects, ASP.NET development services teams configure this properly for production
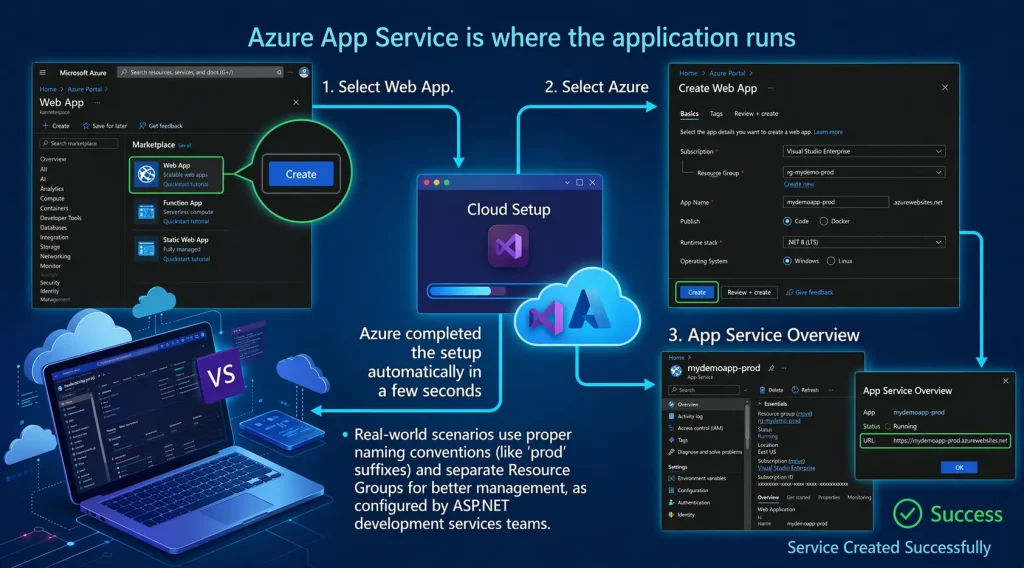
Step 3: Create Azure App Service
- Azure App Service is where the application runs
- Created a new service, entered App Name, Subscription, Resource Group, and selected runtime and region
- Clicked Create, and Azure completed the setup automatically in a few seconds
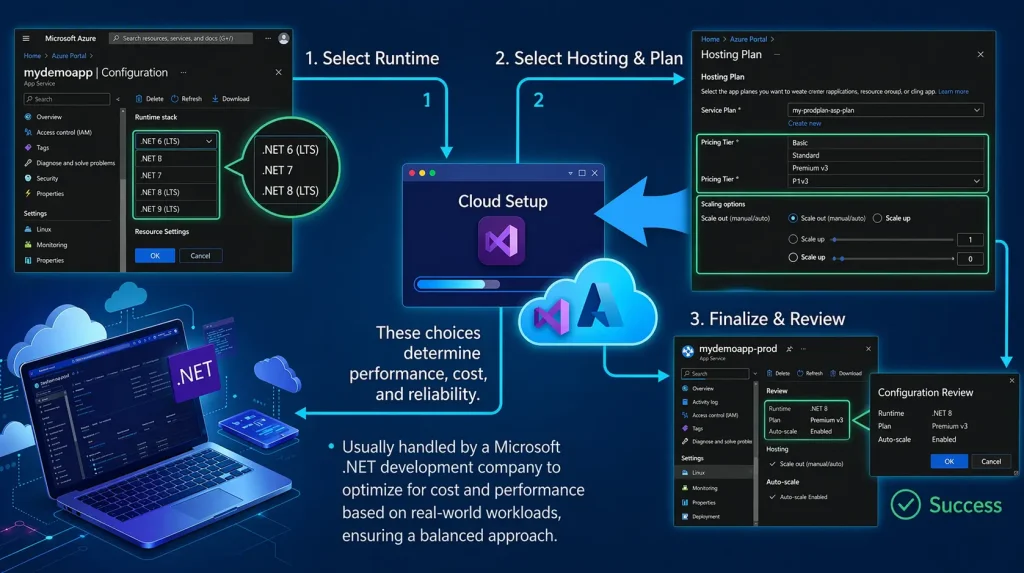
Step 4: Configure Build and Deployment Settings
- Selected runtime version (.NET 6, 7, or 8), hosting plan (Basic, Standard, Premium), and scaling options
- This step affects performance, cost, and reliability
- Usually handled by a Microsoft .NET development company in real projects
Step 5: Deploy ASP.NET Core Application
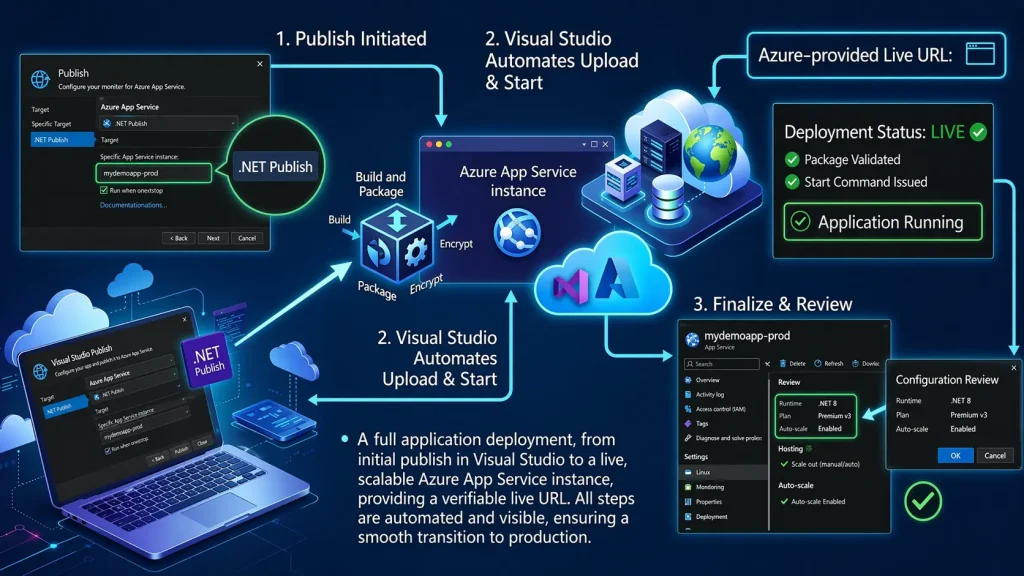
- Clicked Publish in Visual Studio, selected Azure App Service, and deployed the application
- Visual Studio handled build, packaging, and upload, then started the app
- Azure provided a live URL after deployment
Step 6: Verify Deployment
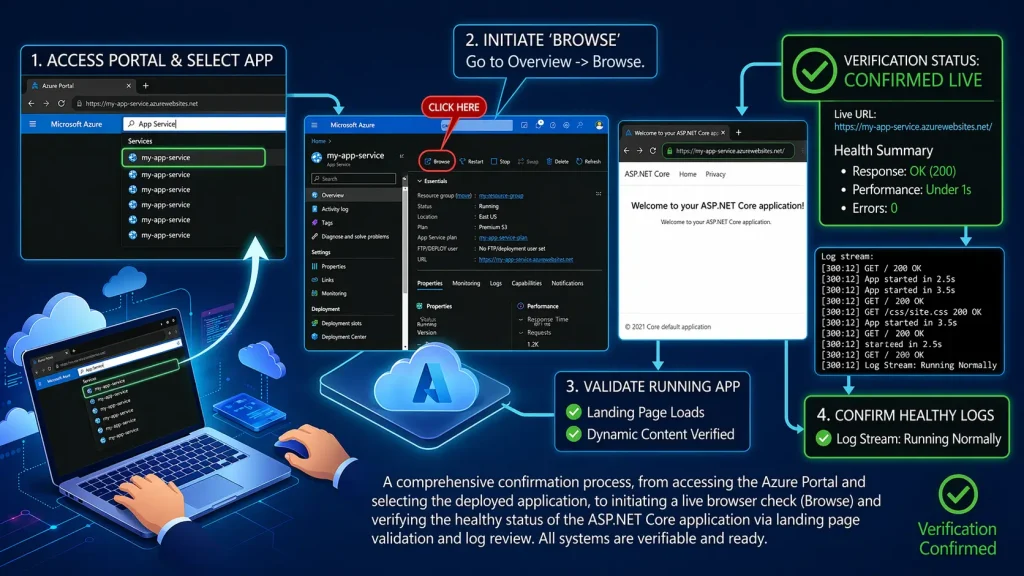
- Opened Azure Portal, went to App Services, and selected the application
- Clicked Browse to check if the ASP.NET Core app was running properly
Step 7: Configure CI/CD Pipeline (Optional but Recommended)
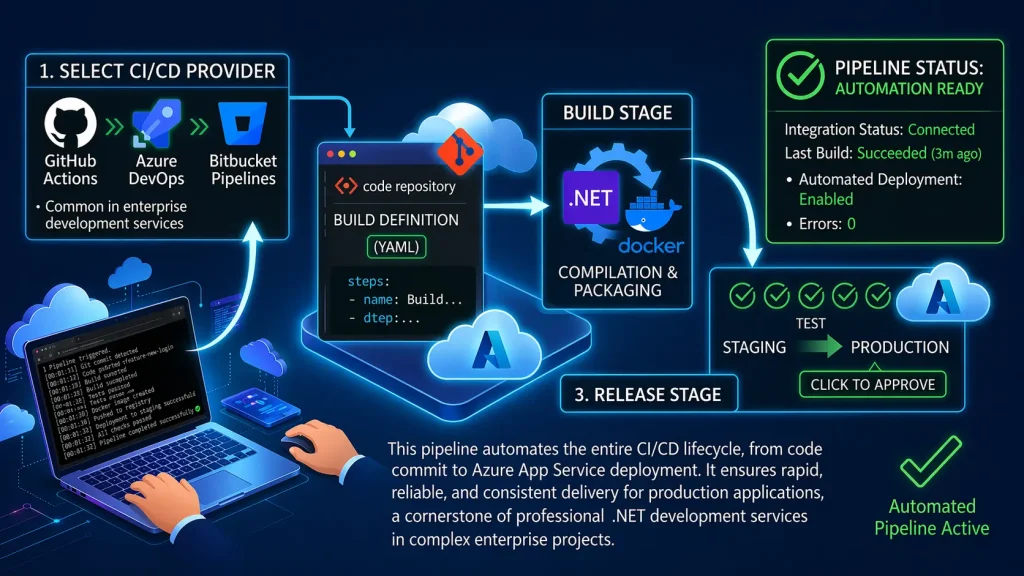
- CI/CD helps automate deployment for production applications
- Azure supports GitHub Actions, Azure DevOps, and Bitbucket Pipelines
- Commonly used by .NET development services teams in enterprise projects
Step 8: Monitoring and Performance Optimization
- Used tools like Application Insights, Live Metrics, and error tracking
- Helps monitor performance and quickly identify issues
- Used by ASP.NET Core development companies to maintain application stability
Step 9: Scaling Your ASP.NET Core App
- Azure supports vertical scaling (CPU/RAM) and horizontal scaling (multiple instances)
- Used when traffic increases to maintain performance
- Common in applications built by a .NET Core development company
Best Practices for Azure Deployment
When working on deployment, I avoided keeping passwords or keys in the code and used environment variables instead, which felt safer and easier to manage. I also made sure HTTPS was enabled because running the app without it didn’t feel secure.
I set up proper logging to track issues when something goes wrong. For sensitive data like API keys, I used Azure Key Vault.
Common Deployment Issues & Fixes
While deploying an ASP.NET Core application on Azure, I ran into some common issues. Nothing major, just small things mostly related to configuration or setup.
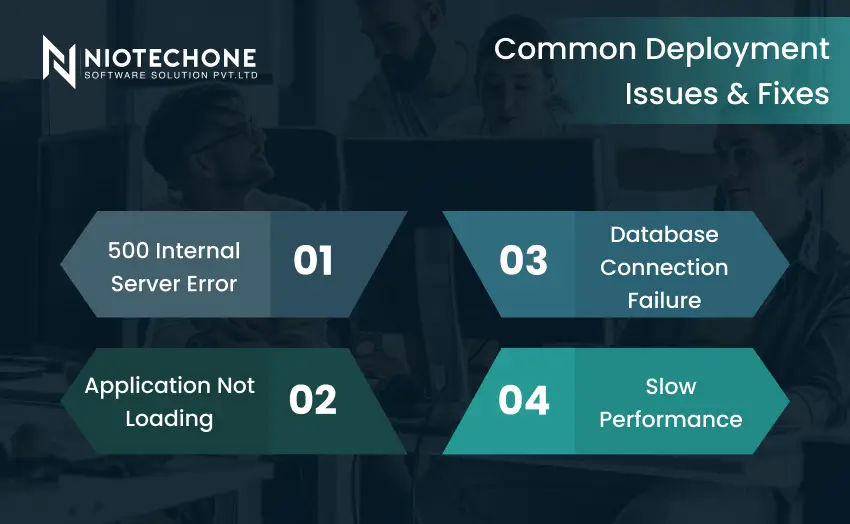
- 500 Internal Server Error: I saw this once; it was a server-side issue. I checked Azure App Service logs and found something wrong in the config.
- Application Not Loading: This happened when the .NET runtime version didn’t match. I changed it and restarted the App Service, then it worked.
- Database Connection Failure: This usually comes from a wrong connection string. In one case, the firewall was also blocking it, so I fixed that.
- Slow Performance: At first, it felt slow; later, I realized caching was not enabled. After that, using Azure CDN, performance improved.
Real-World Use Cases
- E-commerce platforms: Used for building online stores that can handle traffic and payments.
- Banking systems: Used for secure financial apps where data safety is important.
- SaaS applications: Work for apps used by multiple users online.
- Enterprise dashboards: Help in showing business data and reports in real time.
- CRM systems: Used for managing customers, sales tracking, and communication.
Why Businesses Prefer .NET + Azure Stack
From what I’ve seen, businesses prefer the .NET + Azure stack mainly because it gives good security and a stable, scalable cloud setup. Since both are from Microsoft, they work well together and also connect easily with other Microsoft tools, which makes development and deployment smoother.
It also gives a strong backend that can handle complex business applications without much trouble. Plus, with good community support and scalable cloud infrastructure, it kind of becomes a complete setup.
Conclusion
Deploying an ASP.NET Core application on Azure looks like a long process at first, but honestly, once you do it, it’s not that complicated. You go from creating the project to setting up App Services and even CI/CD, and Azure handles most of the things in the background.
Doesn’t really matter if you’re working alone or with a .NET development company, everything you need is already there.
Categories
Related Articles



Related Tags
Frequently Asked Questions FAQs
You can deploy using Visual Studio by publishing directly to Azure App Service.
Yes, Azure is one of the best platforms for scalable cloud hosting of .NET applications.
It is a fully managed platform for hosting web applications, APIs, and mobile backends.
An ASP.NET development company, ASP.NET Core development company, or Microsoft .NET development company typically offers these services.
Use scaling rules, optimize database usage, and choose the correct App Service plan.